Form Scheduling
Form scheduling allows you to control when your forms are visible and accepting submissions. This is perfect for limited-time promotions, event registration, seasonal campaigns, and any time-sensitive form collection.
What is Form Scheduling?
Section titled “What is Form Scheduling?”Form scheduling lets you:
- Set specific time windows for form availability
- Limit total submissions for your form
- Display custom messages when the form is closed
- Automatically hide/show forms based on dates
When to Use Form Scheduling
Section titled “When to Use Form Scheduling”| Use Case | How to Configure |
|---|---|
| Event Registration | Set end date to event start time |
| Limited Offers | Set submission limit to offer quantity |
| Seasonal Forms | Set start/end dates for season |
| Flash Sales | Short time window + submission limit |
| Beta Signups | Limit submissions to beta tester count |
Accessing Schedule Settings
Section titled “Accessing Schedule Settings”- Open your form in the Form Builder
- Go to the Schedule tab in the left panel
- Configure your scheduling options
Enabling Form Scheduling
Section titled “Enabling Form Scheduling”Step 1: Enable Schedule
Section titled “Step 1: Enable Schedule”Toggle Enable schedule to ON to activate scheduling features.

Step 2: Configure Time Settings
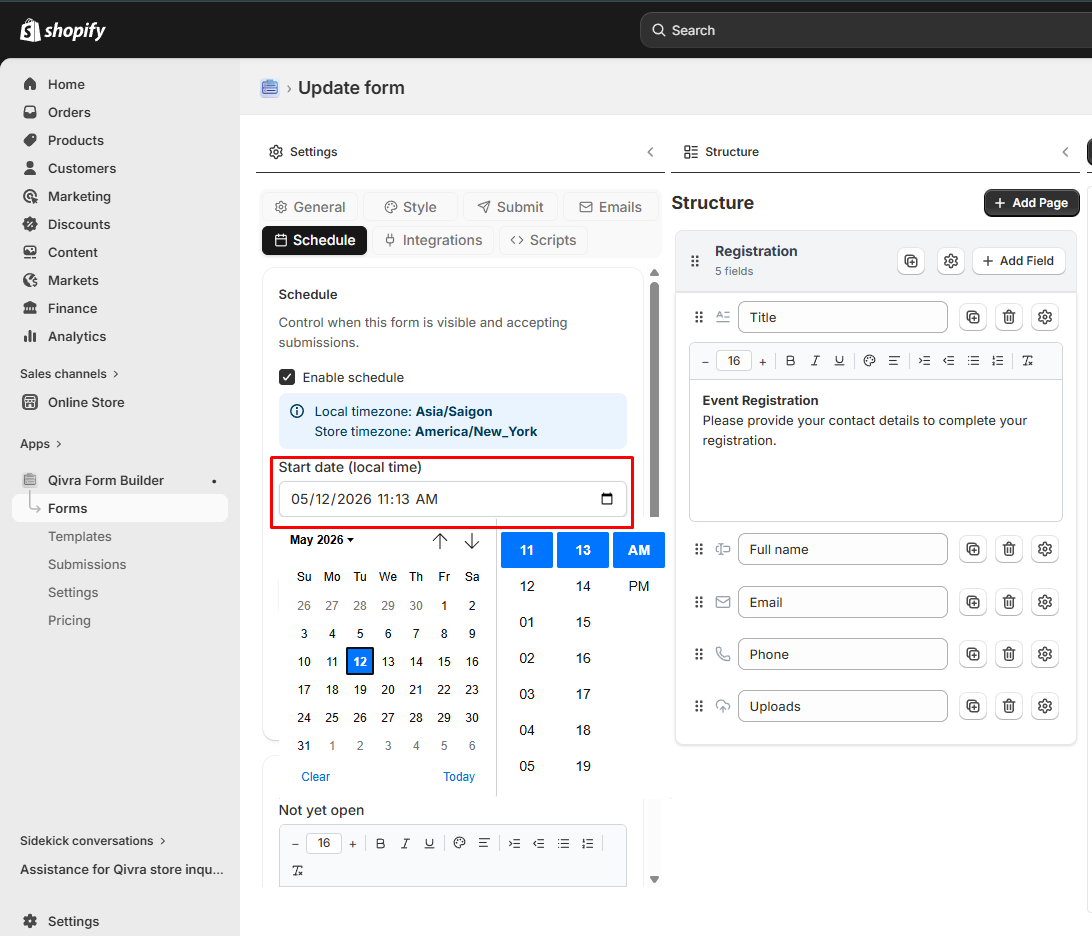
Section titled “Step 2: Configure Time Settings”Start Date
Section titled “Start Date”- What it does: Form becomes visible at this date/time
- How to set: Use the date-time picker
- Timezone: Times are shown in your local timezone
- Important: The form will be hidden before this time
End Date
Section titled “End Date”- What it does: Form closes and stops accepting submissions
- How to set: Use the date-time picker
- Timezone: Times are shown in your local timezone
- Important: The form will show the “Expired” message after this time
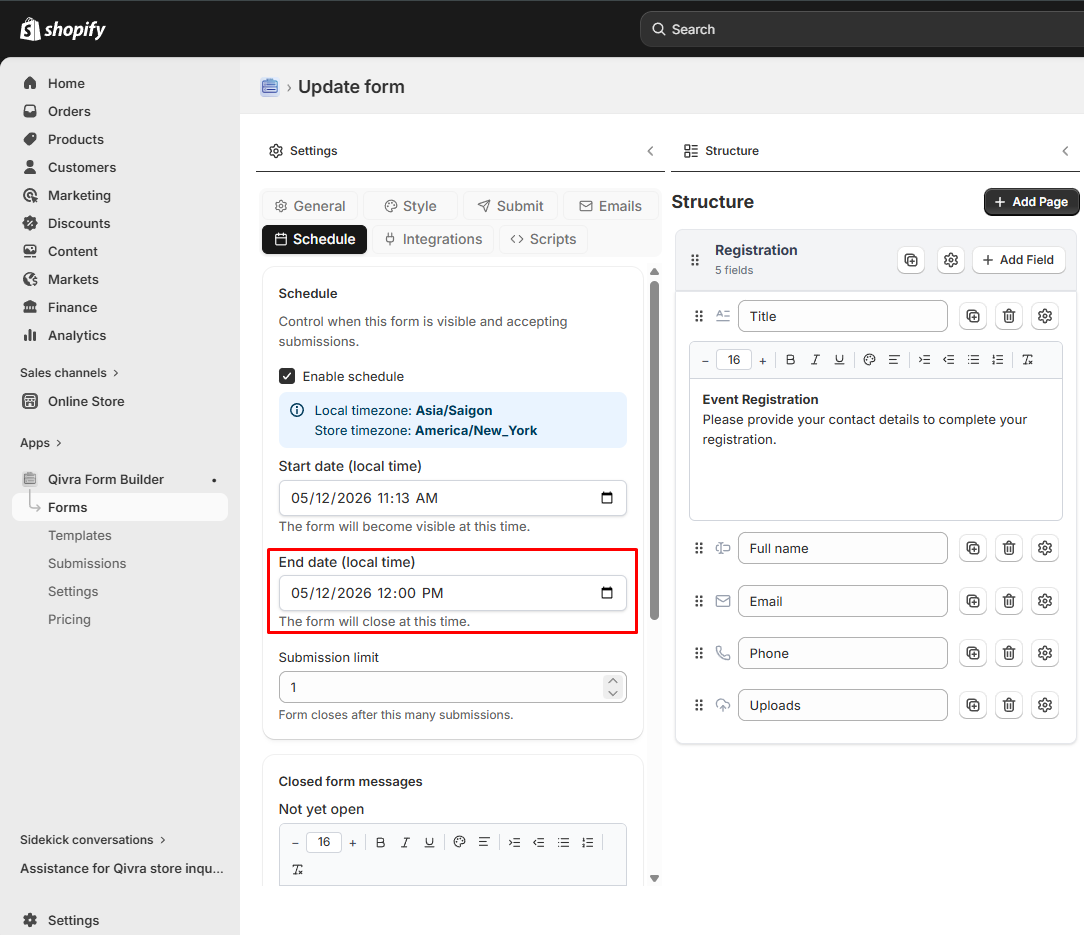
Step 3: Set Submission Limit (Optional)
Section titled “Step 3: Set Submission Limit (Optional)”- What it does: Form closes after receiving a specified number of submissions
- How to set: Enter a number in the “Submission limit” field
- Leave blank: For unlimited submissions
- Note: Works independently of time settings

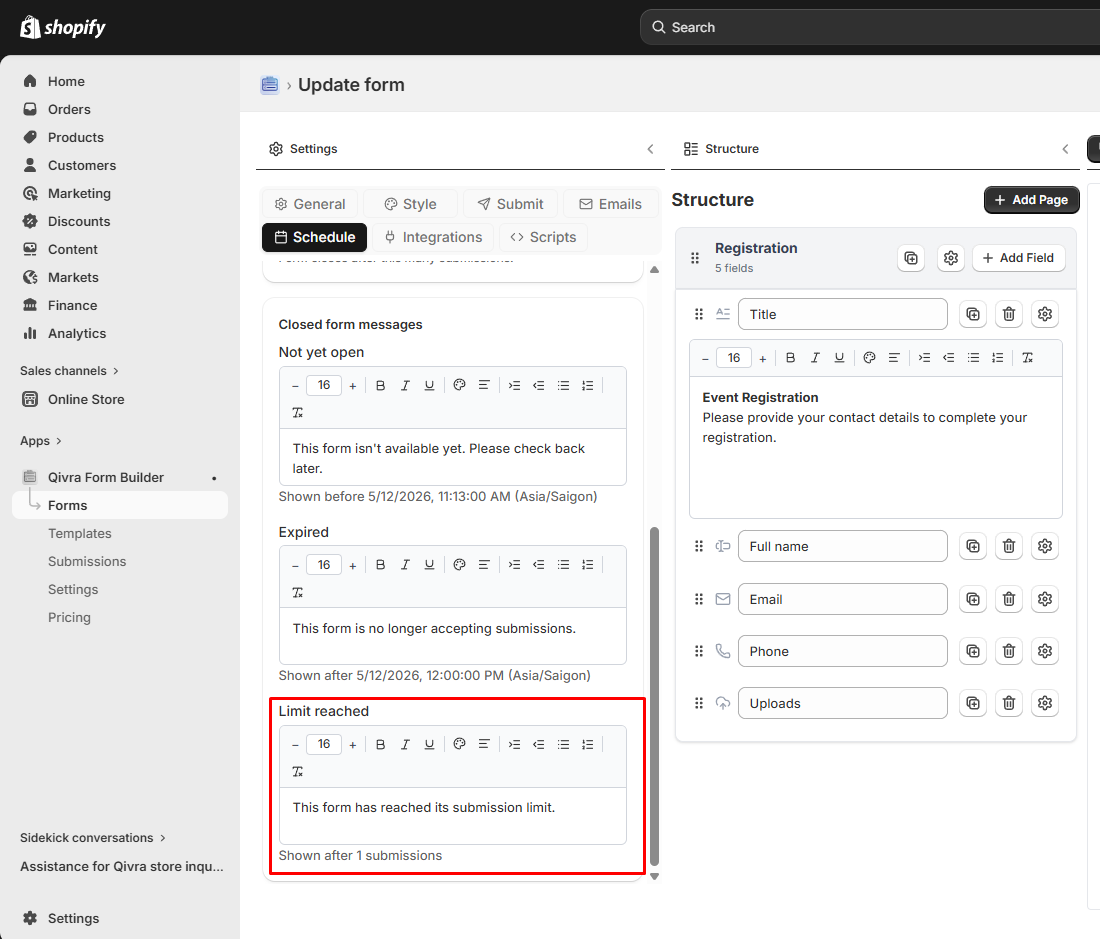
Configuring Closed Form Messages
Section titled “Configuring Closed Form Messages”When scheduling is enabled, you can customize messages shown when the form is unavailable.
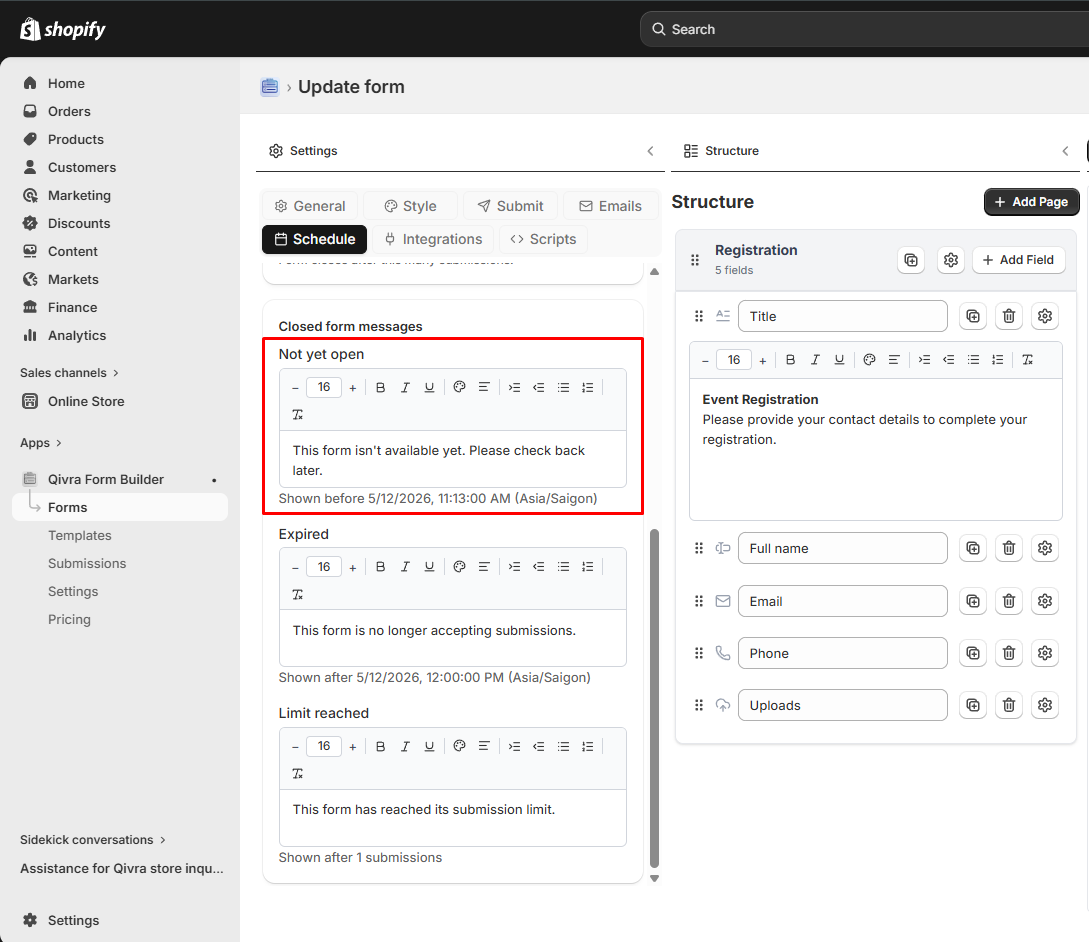
Not Yet Open Message
Section titled “Not Yet Open Message”- Shown: Before the start date (if set)
- Default: “This form isn’t available yet. Please check back later.”
- Customization: Use the rich text editor for formatted messages
- Best practice: Include when the form will open
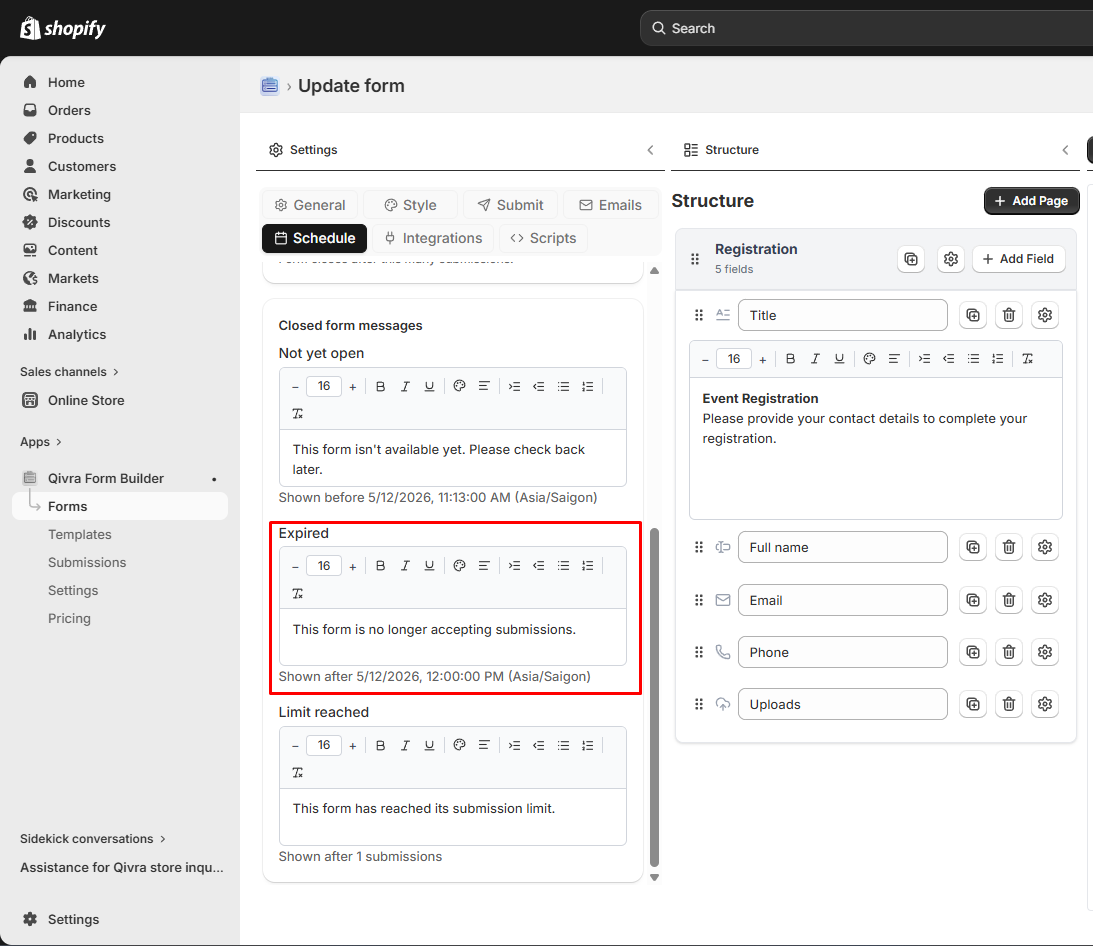
Expired Message
Section titled “Expired Message”- Shown: After the end date (if set)
- Default: “This form is no longer accepting submissions.”
- Customization: Use the rich text editor for formatted messages
- Best practice: Include link to contact page or other resources
Limit Reached Message
Section titled “Limit Reached Message”- Shown: When submission limit is reached
- Default: “This form has reached its submission limit.”
- Customization: Use the rich text editor for formatted messages
- Best practice: Explain when or if the form will reopen
Timezone Considerations
Section titled “Timezone Considerations”Store Timezone vs. Local Timezone
Section titled “Store Timezone vs. Local Timezone”The schedule settings display:
| Timezone | Description |
|---|---|
| Local timezone | Your browser’s current timezone |
| Store timezone | Your Shopify store’s configured timezone |
Important: All date/time values are stored in UTC and converted for display. The form will respect the exact times you set, regardless of customer location.
Best Practices for Timezones
Section titled “Best Practices for Timezones”- Always check both timezones when setting dates
- Test with different timezones if you have global customers
- Consider your primary audience when setting times
- Use clear messaging about time zones in closed messages
Resetting Submission Count
Section titled “Resetting Submission Count”When you enable scheduling on a form that already has submissions, you may see an option to reset the submission counter.
When to Reset
Section titled “When to Reset”- Reset: If you want to start counting from zero for a new campaign
- Don’t reset: If you want to continue counting existing submissions
How to Reset
Section titled “How to Reset”- Make changes to schedule settings
- Check the “Reset submission count to 0” option if it appears
- Save the form
Examples
Section titled “Examples”Example 1: Event Registration
Section titled “Example 1: Event Registration”Event: Workshop on March 15, 2026, 2:00 PMGoal: Accept registrations until March 14, 2026, 5:00 PMLimit: 50 participants
Configuration:- Enable schedule: ON- Start date: (Leave blank - open immediately)- End date: March 14, 2026, 5:00 PM- Submission limit: 50- Expired message: "Registration is now closed. Please contact us to be added to the waitlist."Example 2: Flash Sale Form
Section titled “Example 2: Flash Sale Form”Sale: 24-hour flash sale starting Black FridayGoal: Collect first 100 orders
Configuration:- Enable schedule: ON- Start date: Black Friday, 12:00 AM- End date: Black Friday, 11:59 PM- Submission limit: 100- Expired message: "This sale has ended. Sign up for notifications about future sales!"Example 3: Beta Testing Signup
Section titled “Example 3: Beta Testing Signup”Goal: Recruit 25 beta testersTimeline: Open for 1 week
Configuration:- Enable schedule: ON- Start date: (Leave blank - open immediately)- End date: 7 days from now- Submission limit: 25- Limit reached message: "We've reached our beta tester limit! Follow us for updates on the public launch."Testing Scheduled Forms
Section titled “Testing Scheduled Forms”Before Publishing
Section titled “Before Publishing”- Preview the form to see current status
- Test closed messages by temporarily setting dates
- Verify timezone settings match your intent
- Test submission limit with a low number first
Checking Form Status
Section titled “Checking Form Status”In the form dashboard, you’ll see:
| Status | Meaning |
|---|---|
| Active | Form is currently accepting submissions |
| Scheduled | Form will open at the start date |
| Expired | Form has passed its end date |
| Limit Reached | Form has reached submission limit |
Troubleshooting
Section titled “Troubleshooting”Form Not Appearing When Expected
Section titled “Form Not Appearing When Expected”- Check start date: Is it in the future?
- Verify timezone: Are you looking at the right timezone?
- Check form display settings: Is the form properly embedded?
Form Not Closing When Expected
Section titled “Form Not Closing When Expected”- Check end date: Is it correctly set?
- Verify timezone settings
- Clear browser cache: Old form might be cached
- Check submission limit: Has it been reached?
Submission Limit Not Working
Section titled “Submission Limit Not Working”- Is schedule enabled?: The toggle must be ON
- Is limit set?: Make sure a number is entered
- Reset counter: Try resetting if testing multiple times
Best Practices
Section titled “Best Practices”Planning
Section titled “Planning”- Test thoroughly: Always test scheduling before going live
- Set reminders: Note when forms will close
- Plan content: Have closed messages ready
Communication
Section titled “Communication”- Be transparent: Tell customers when forms close
- Provide alternatives: Offer contact methods when forms are closed
- Set expectations: Clearly communicate deadlines
Monitoring
Section titled “Monitoring”- Watch submission count: Check if approaching limits
- Monitor dates: Extend if needed for campaigns
- Review performance: Analyze submission patterns