Customize Email Templates
This guide will show you how to customize email templates for both notification emails (sent to you/your team) and auto-response emails (sent to customers after they submit a form).
Types of Email Templates
Section titled “Types of Email Templates”Qivra Form Builder supports two types of email templates:
1. Notification Emails
Section titled “1. Notification Emails”Emails sent to you or your team when a customer submits a form. You can configure:
- To, CC, BCC recipients (up to 5 email addresses)
- Subject line for the notification email
2. Auto-Response Emails
Section titled “2. Auto-Response Emails”Automatic confirmation emails sent to customers immediately after they submit your form. You can customize:
- Sender name displayed to customers
- Recipient field - which email field from the form receives the email
- Subject and body with personalized content using tokens
Accessing Email Settings
Section titled “Accessing Email Settings”- Go to Forms in your app dashboard
- Click Edit on the form you want to configure
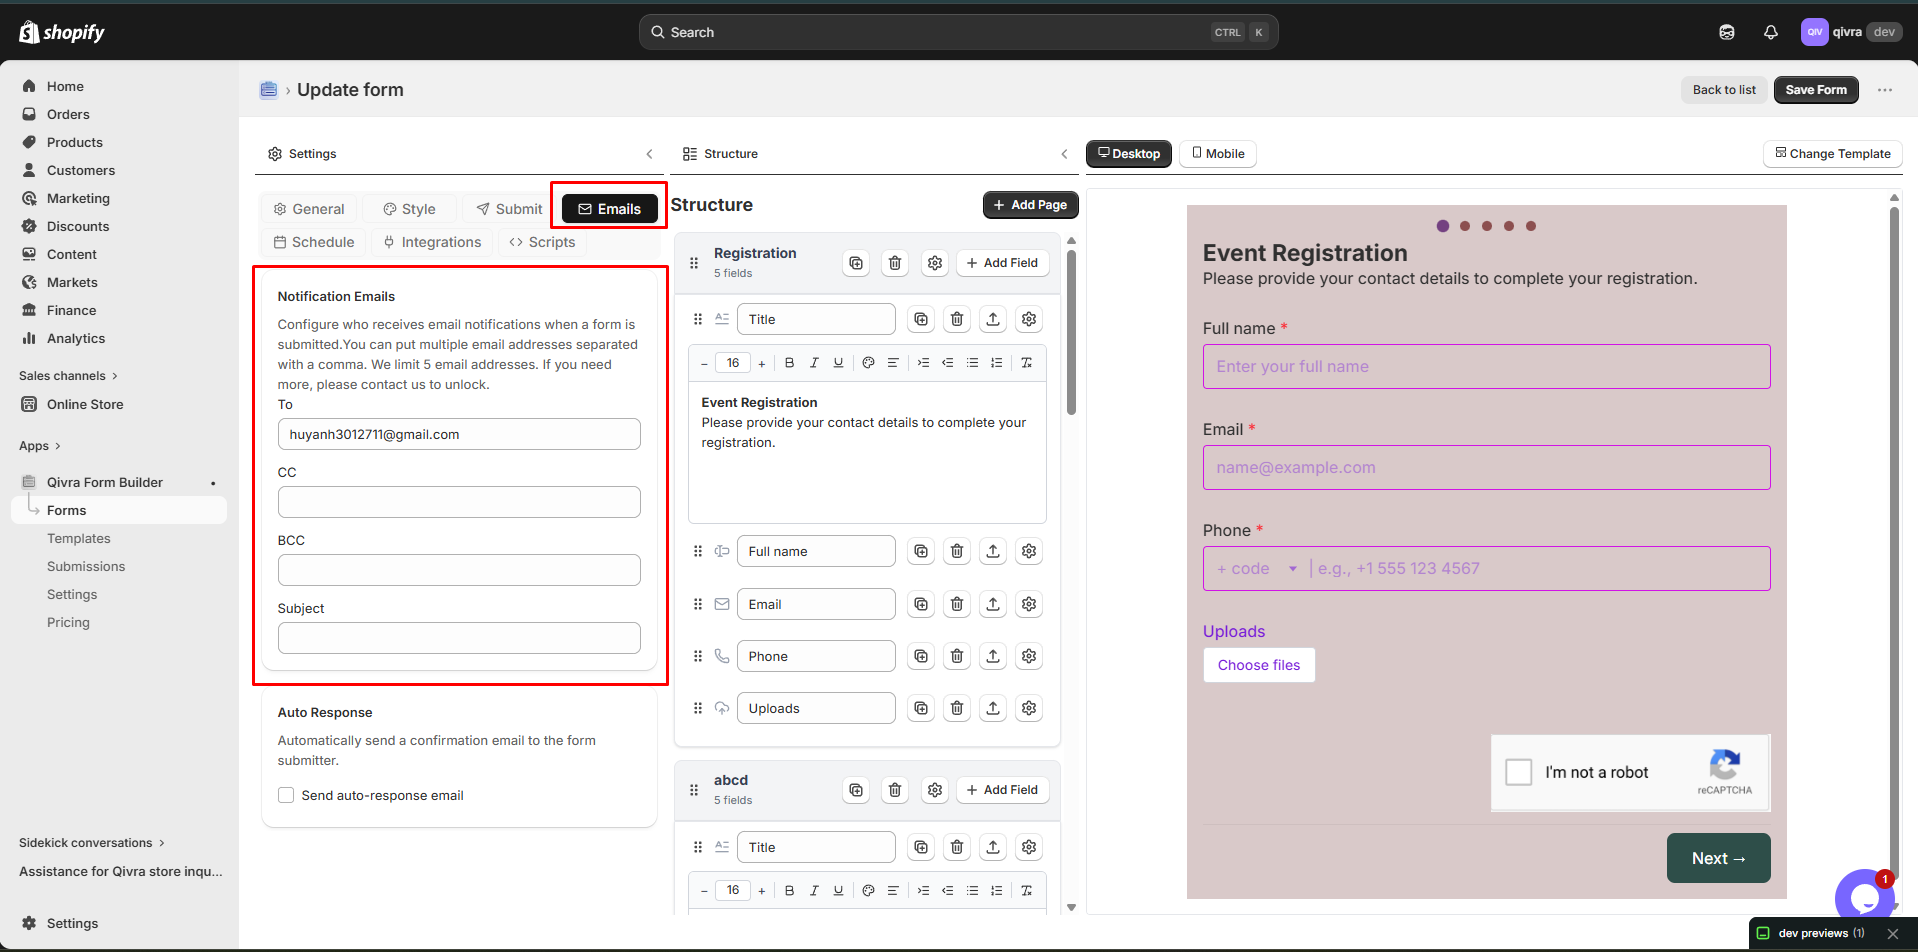
- In the form editor, click the Email tab in the right sidebar
Configuring Notification Emails
Section titled “Configuring Notification Emails”The Notification Emails section lets you set who receives form submissions.
Step 1: Set Email Recipients
Section titled “Step 1: Set Email Recipients”In the Notification Emails section:
- To - Enter the main recipient email address (or multiple addresses separated by commas)
- CC - Add CC recipients if needed
- BCC - Add BCC recipients if needed
Note: You can add up to 5 email addresses total. Need more? Contact us to unlock higher limits.
Step 2: Customize Subject
Section titled “Step 2: Customize Subject”Enter a custom subject line for the notification email. This helps you quickly identify which form was submitted.
Example subjects:
- “New Contact Form Submission”
- “Wholesale Inquiry”
- “Product Question”
Configuring Auto-Response Emails
Section titled “Configuring Auto-Response Emails”Auto-response emails are sent automatically to customers after they submit your form. This helps confirm their submission and provides a better customer experience.
Requirements
Section titled “Requirements”To enable auto-response emails, your form must contain at least one Email field. The checkbox will be disabled if no email field exists in your form.
Step 1: Enable Auto-Response
Section titled “Step 1: Enable Auto-Response”- In the Email tab, find the Auto Response section
- Check the box “Send auto-response email”
- Click the Edit email button to open the email composer
The email composer modal will open where you can customize your email.
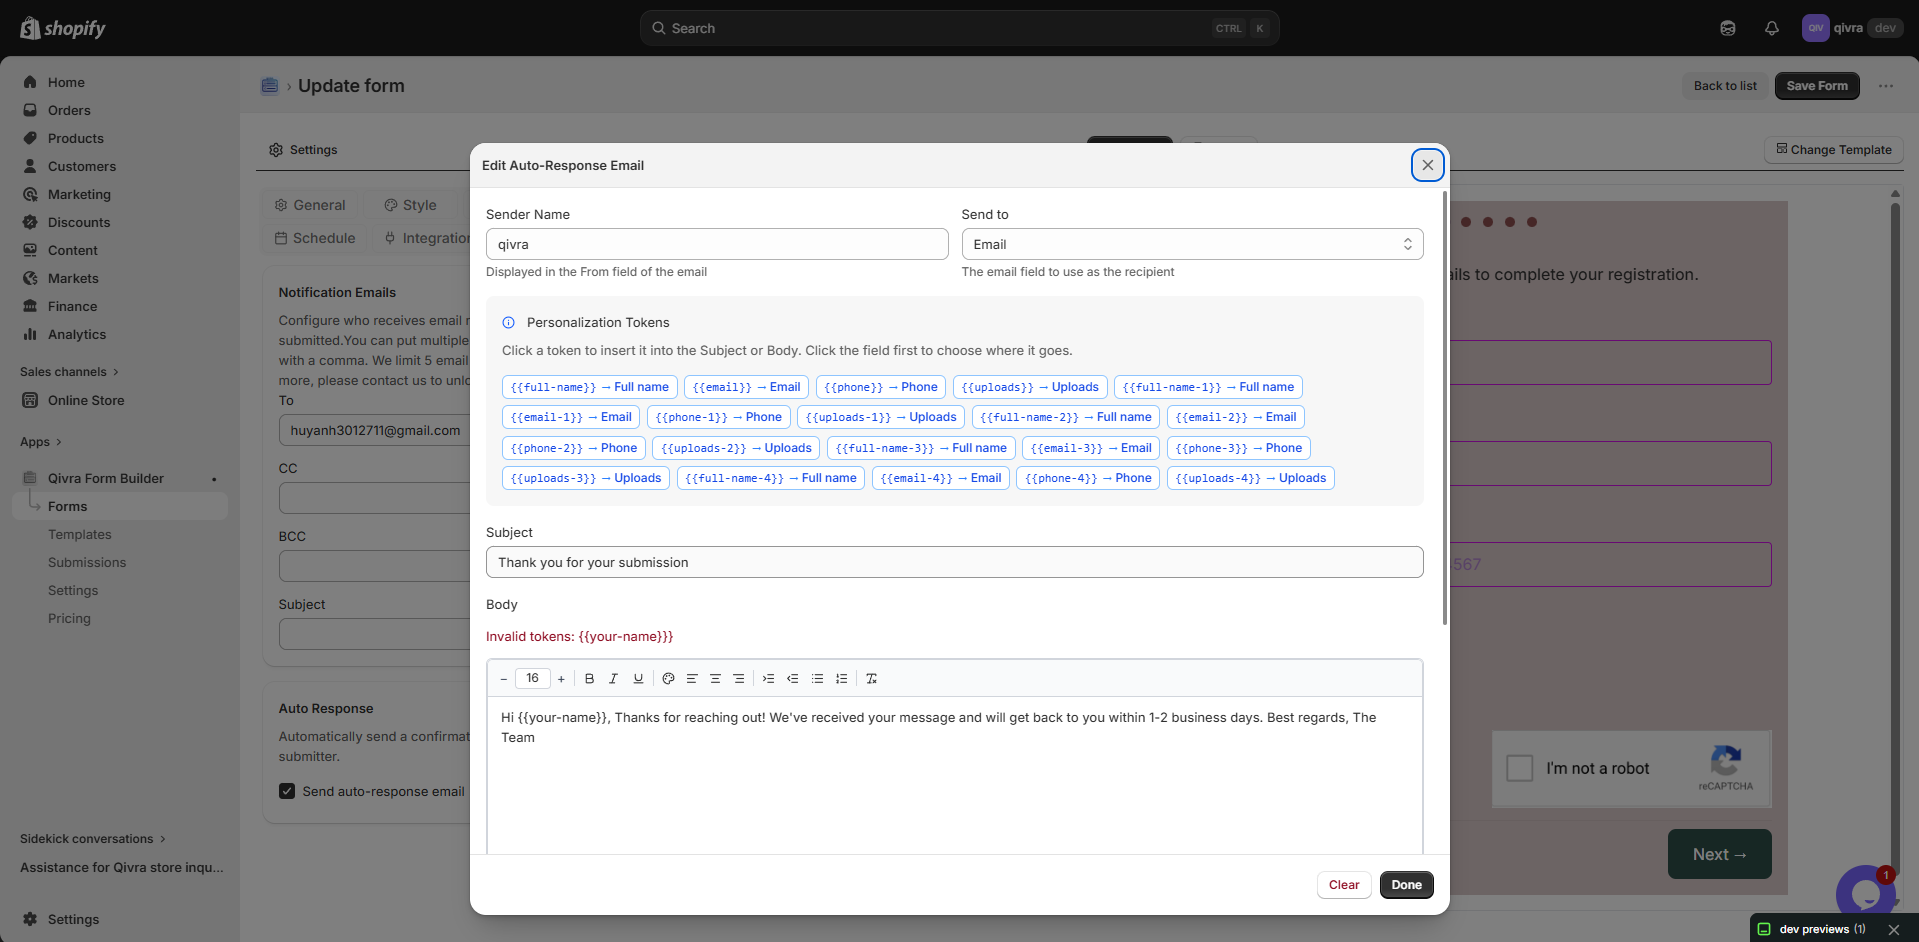
Step 2: Configure Sender Information
Section titled “Step 2: Configure Sender Information”In the email composer modal:
Sender Name:
- Enter the name that will appear in the “From” field
- Use your store name or a recognizable brand name
- Example: “Your Store Name” or “Customer Support Team”
Send to (Recipient):
- Select which email field from your form should receive the auto-response
- Only email fields in your form will appear in this dropdown
- If you have multiple email fields, choose the primary one (e.g., “Customer Email”)
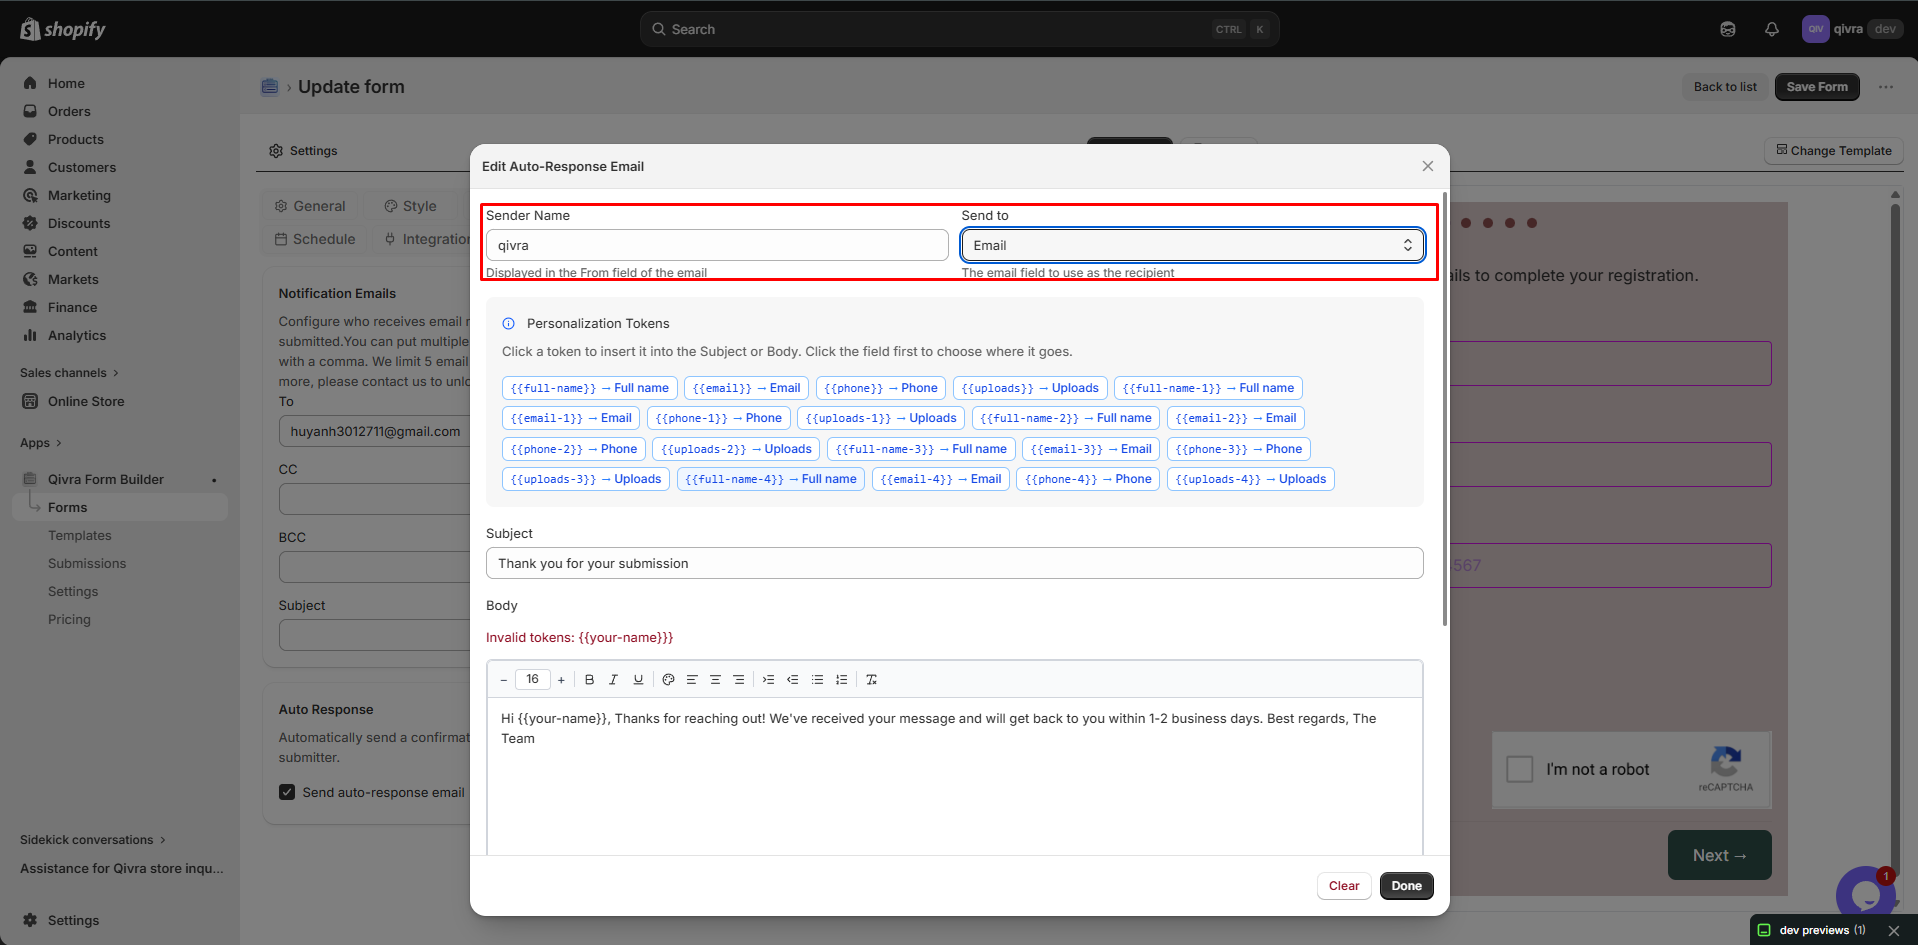
Step 3: Customize Subject and Body
Section titled “Step 3: Customize Subject and Body”Subject Line:
- Enter a clear, friendly subject line
- Use personalization tokens to make it more engaging
Email Body:
- Use the rich text editor to write your message
- Format text with bold, italic, lists, and more
- Insert links, images, or other content as needed
- Use personalization tokens to insert customer data
Using Personalization Tokens
Section titled “Using Personalization Tokens”Personalization tokens (also called “merge tags”) let you insert customer data from the form into your email. Tokens are automatically generated from your form fields.
How to use tokens:
- In the email composer, look at the Personalization Tokens section
- Click on any token to insert it into your email
- First, click in the Subject field or Body editor where you want to insert the token
- Then click the token button
Token format: {{field-name}}
Example tokens:
{{your-name}}- Customer’s name{{email}}- Customer’s email address{{phone}}- Phone number{{company-name}}- Company name (if you have this field){{message}}- Customer’s message
Each token button shows both the token code and the field name, making it easy to identify which data it represents.
Example auto-response email:
Subject: Thank you for your inquiry, {{your-name}}!
Body:
<p>Hi {{your-name}},</p>
<p>Thank you for reaching out to us! We've received your message and will get back to you within 1-2 business days.</p>
<p>Here's a summary of what you submitted:</p><ul>  <li><strong>Email:</strong> {{email}}</li>  <li><strong>Phone:</strong> {{phone}}</li>  <li><strong>Message:</strong> {{message}}</li></ul>
<p>If you have any questions in the meantime, feel free to reply to this email.</p>
<p>Best regards,<br>The Team</p>
Step 4: Test Your Email
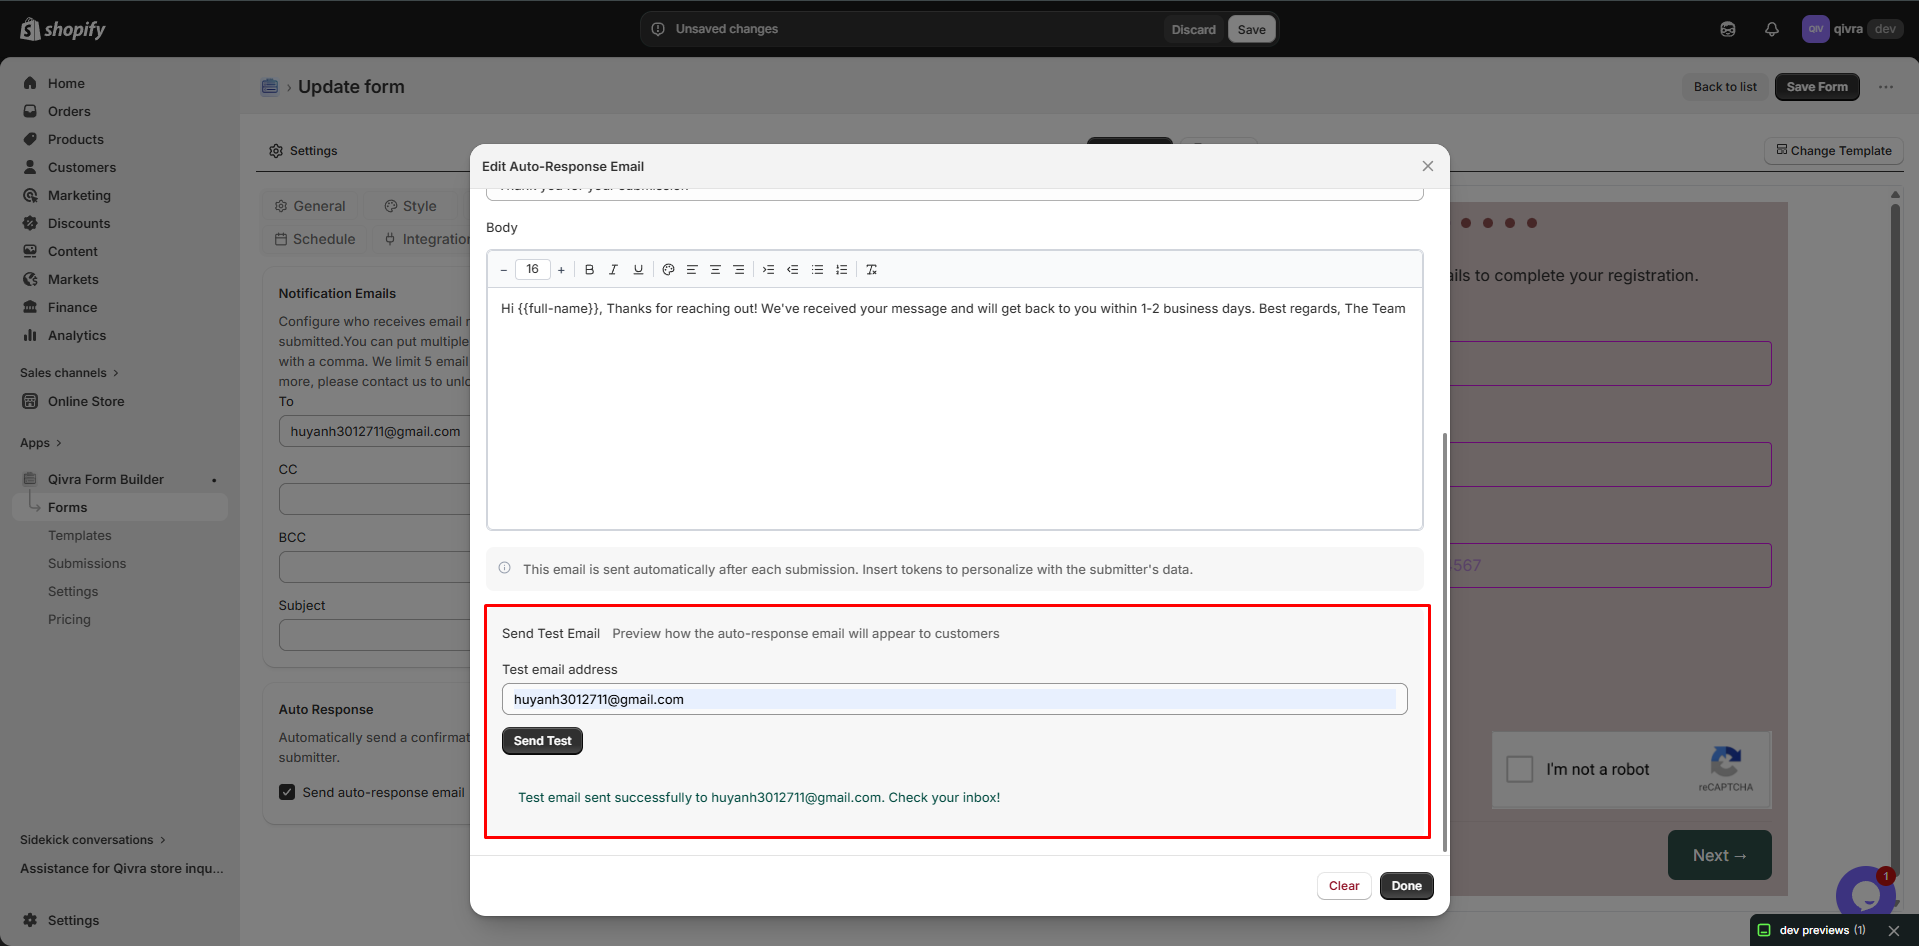
Section titled “Step 4: Test Your Email”Before saving, test your auto-response email to see how it will look to customers.
- In the Send Test Email section at the bottom of the modal
- Enter a test email address (your own email)
- Click Send Test
- Check your inbox to see the actual email
Benefits of testing:
- Verify all tokens display correctly
- Check formatting and layout
- Ensure links work properly
- Catch any spelling or grammar mistakes
Step 5: Save Your Changes
Section titled “Step 5: Save Your Changes”- Click the Done button to close the email composer
- Click Save on the form editor to save all changes
⚠️ Important: Always click Save after making changes, or your customization will be lost.
Managing Token Errors
Section titled “Managing Token Errors”If you delete or rename a form field that has a token in your email template, the token will become invalid.
How we handle token errors:
- A red ! badge appears on the “Edit email” button
- The email composer shows which tokens are invalid
- Invalid tokens will not display customer data in sent emails
How to fix token errors:
- Open the email composer
- Look for error messages showing invalid tokens
- Either:
- Remove the invalid token from your email
- Replace it with a valid token from the token list
Note: Tokens automatically update when you rename a field while keeping the same ID. This helps prevent errors during normal editing.
Tips for Effective Auto-Response Emails
Section titled “Tips for Effective Auto-Response Emails”- Keep it brief - Customers prefer short, clear confirmations
- Set expectations - Let them know when you’ll respond
- Personalize - Use tokens to address customers by name
- Add value - Include links to helpful resources or FAQs
- Test thoroughly - Always send test emails before going live
Don’ts:
Section titled “Don’ts:”- Don’t use all caps - It looks like spam
- Don’t include sensitive info - Never include passwords or credit card details
- Don’t overpromise - Only commit to response times you can meet
- Don’t forget to test - Untested emails may have formatting issues
Email Template Best Practices
Section titled “Email Template Best Practices”Subject Lines
Section titled “Subject Lines”- Keep under 50 characters for mobile devices
- Include relevant tokens for personalization
- Be clear about the email purpose
Good examples:
- “Thanks for contacting us,
{{first-name}}!” - “Your inquiry has been received”
- “Application received -
{{company-name}}”
Email Body
Section titled “Email Body”- Use a friendly, professional tone
- Break up text with paragraphs and bullet points
- Include a clear call-to-action if needed
- Add your brand signature at the end
Timing and Frequency
Section titled “Timing and Frequency”- Auto-response emails are sent immediately after submission
- Only one auto-response per form submission
- Notification emails are sent immediately to your team
Common Use Cases
Section titled “Common Use Cases”Use Case 1: Contact Form Confirmation
Section titled “Use Case 1: Contact Form Confirmation”Subject: Thanks for reaching out, {{name}}!
Body:
<p>Hi {{name}},</p>
<p>Thanks for contacting us! We've received your message and a member of our team will get back to you within 24 hours.</p>
<p><strong>Your message:</strong></p><p>{{message}}</p>
<p>In the meantime, check out our <a href="#">FAQ page</a> for instant answers to common questions.</p>
<p>Best regards,<br>{{from-name}}</p>
Use Case 2: Wholesale Application
Section titled “Use Case 2: Wholesale Application”Subject: Wholesale Application Received - {{company-name}}
Body:
<p>Dear {{name}},</p>
<p>Thank you for your interest in our wholesale program! We've received your application from {{company-name}}.</p>
<p>Our wholesale team will review your application and contact you at {{email}} within 2-3 business days.</p>
<p>If you have questions, reply to this email anytime.</p>
<p>Best regards,<br>Wholesale Team</p>
Use Case 3: Product Inquiry
Section titled “Use Case 3: Product Inquiry”Subject: Question about {{product-name}}
Body:
<p>Hi {{name}},</p>
<p>Thanks for your question about <strong>{{product-name}}</strong>!</p>
<p>Our product specialists have received your inquiry and will respond to {{email}} within 24 hours with detailed information.</p>
<p><strong>Your question:</strong></p><p>{{message}}</p>
<p>Can't wait? Browse our <a href="#">product catalog</a> for more details.</p>
<p>Thanks for your interest!</p>
Troubleshooting
Section titled “Troubleshooting”Auto-response checkbox is disabled
Section titled “Auto-response checkbox is disabled”Problem: You can’t check “Send auto-response email”
Solution: Your form doesn’t have an email field. Add an Email field to your form first.
Test email not received
Section titled “Test email not received”Problem: You clicked “Send Test” but didn’t receive the email
Solutions:
- Check your spam/junk folder
- Verify the test email address is correct
- Try sending to a different email address
- Check if your email service is blocking messages
Tokens not displaying correctly
Section titled “Tokens not displaying correctly”Problem: Tokens appear as {{token-name}} instead of actual data
Solutions:
- Make sure the customer filled in that field
- Check if the token name matches your field name exactly
- Verify the field is not hidden from the form
Invalid token error
Section titled “Invalid token error”Problem: Red badge appears on “Edit email” button
Solution: Open the email composer and remove or replace any invalid tokens shown in the error message.