Setup Mailchimp Integration
Mailchimp is a popular email marketing platform. This guide shows you how to integrate Mailchimp with Qivra Form Builder to sync contacts and send notifications.
What This Integration Does
Section titled “What This Integration Does”| Feature | Description |
|---|---|
| Contact Sync | Add form submitters to Mailchimp lists |
| Email Notifications | Send notifications via Mailchimp |
| Marketing Automation | Trigger Mailchimp campaigns |
| Audience Building | Grow your email list from forms |
Prerequisites
Section titled “Prerequisites”Before setting up Mailchimp:
- Have a Mailchimp account
- Know which Audience/List to use
- Have API key ready
Getting Mailchimp API Key
Section titled “Getting Mailchimp API Key”To begin, you’ll need an API key from your Mailchimp account:
- Log in to your Mailchimp account
- Navigate to Account > Extras > API Keys
- Click Create A Key
- Copy the generated key for use
Reference: https://help.klaviyo.com/hc/en-us/articles/115005062267-Manage-Your-Account-s-API-Keys
Finding Your Audience ID
Section titled “Finding Your Audience ID”Step 1: Go to Audiences
Section titled “Step 1: Go to Audiences”- In Mailchimp, click Audience
- Click three dots > Audience settings
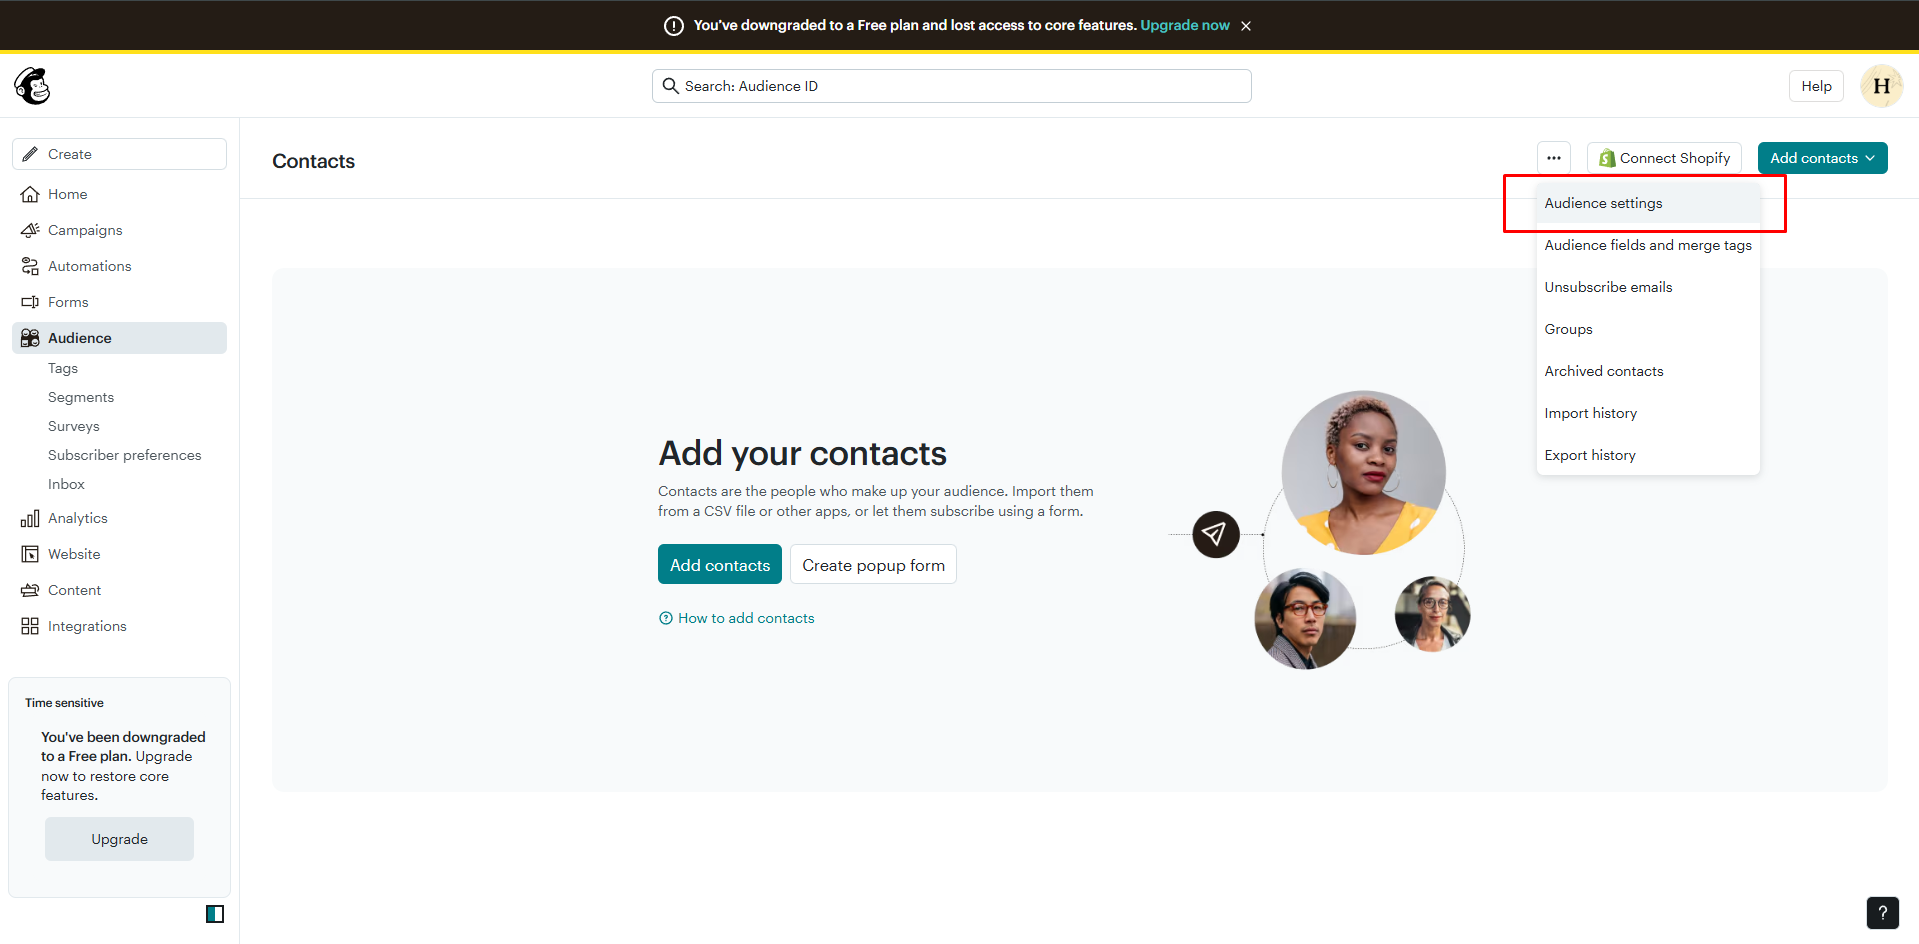
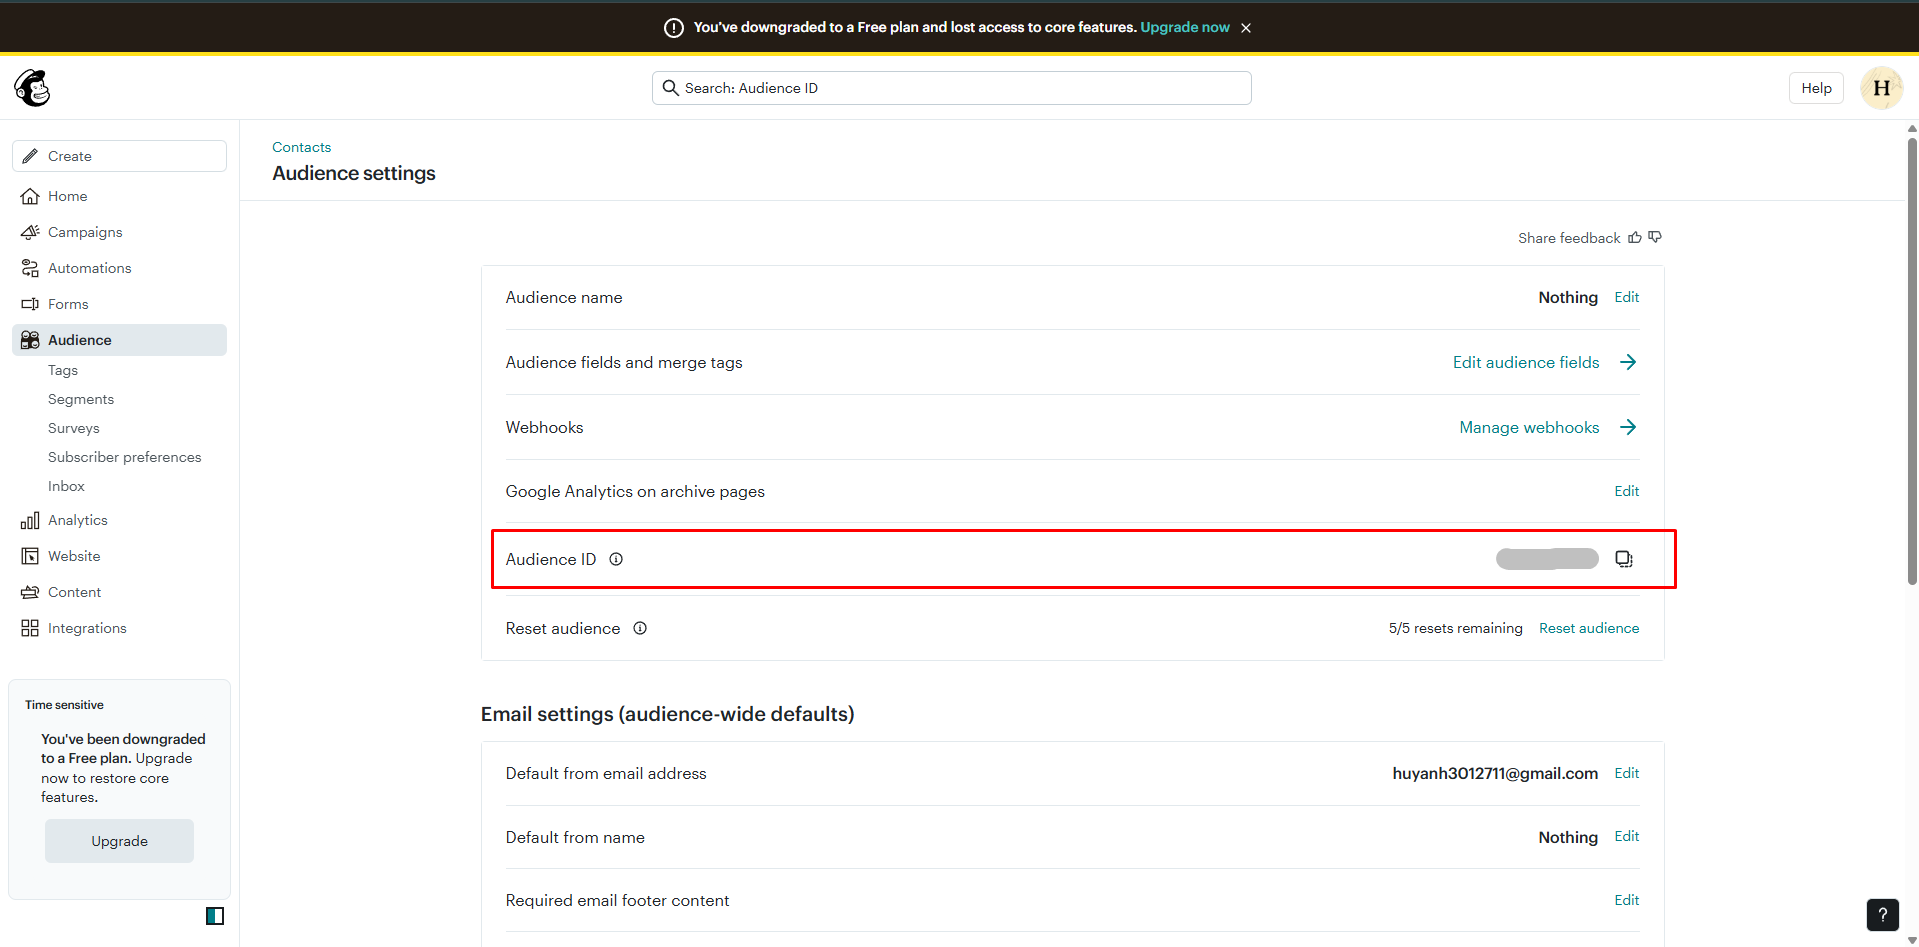
Step 2: Copy Audience ID
Section titled “Step 2: Copy Audience ID”The Audience ID looks like: a1b2c3d4e5
Reference: https://mailchimp.com/fr/help/find-audience-id/
Configuring Mailchimp in Qivra Form Builder
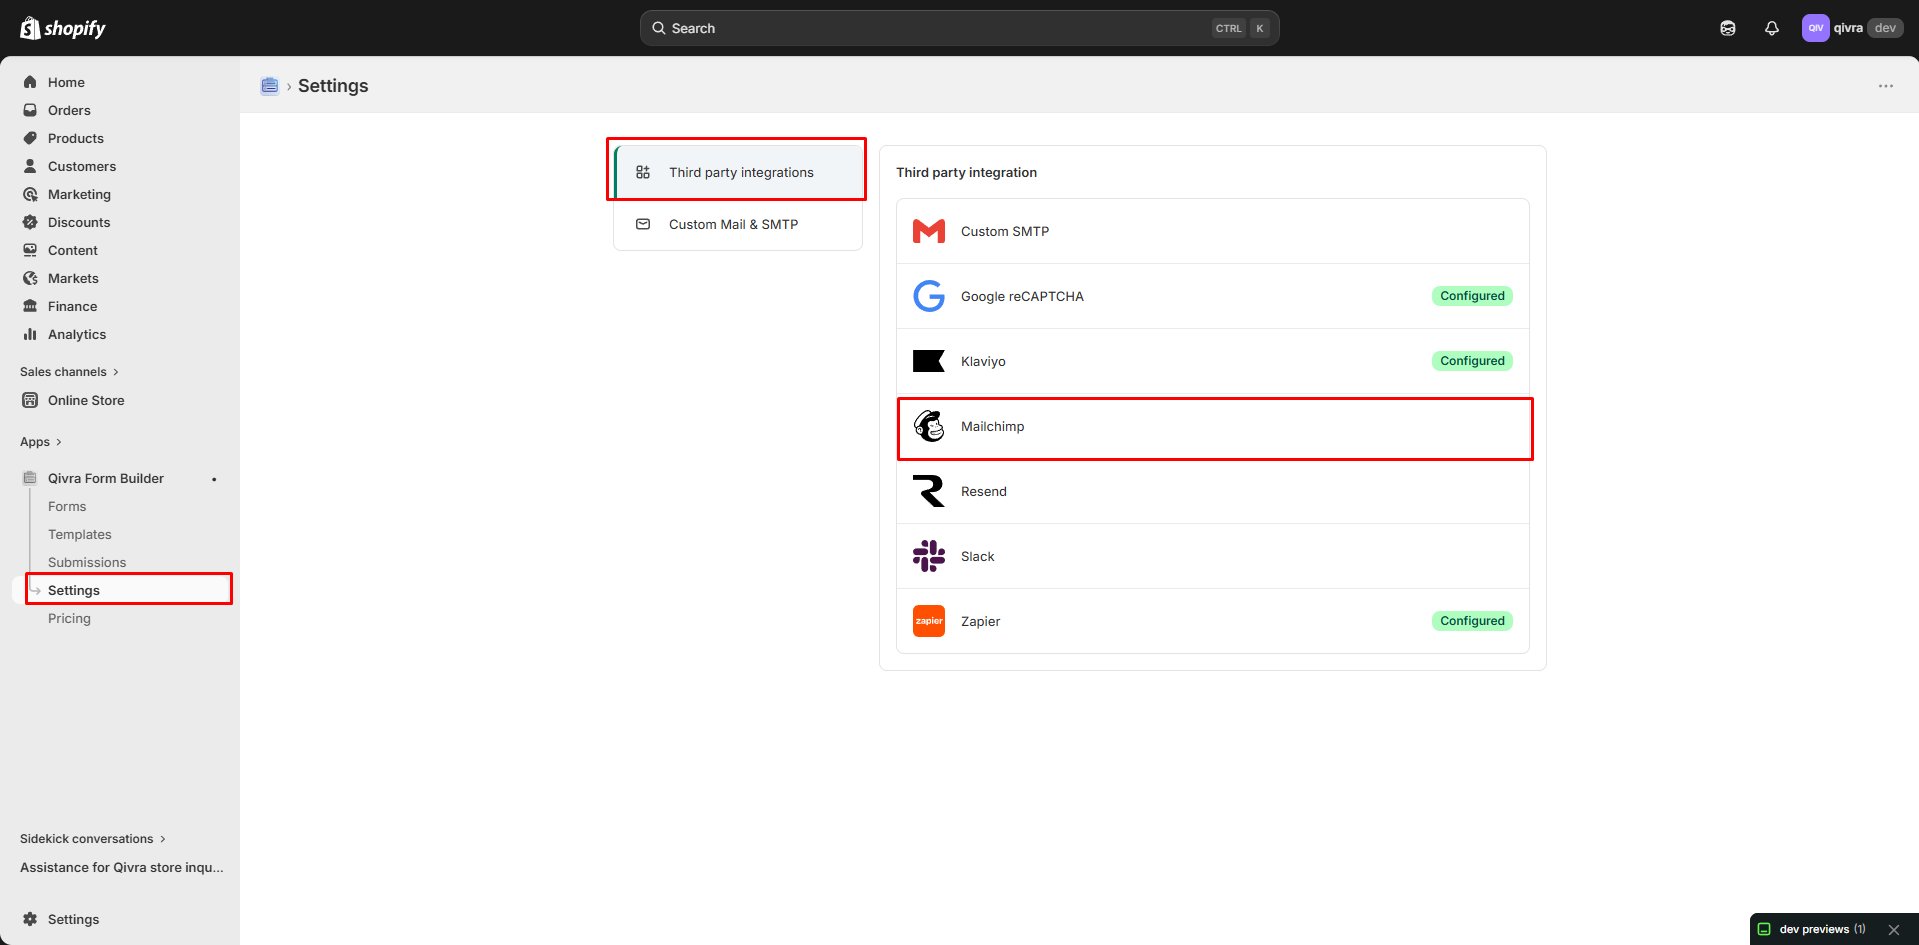
Section titled “Configuring Mailchimp in Qivra Form Builder”Step 1: Open Settings
Section titled “Step 1: Open Settings”- Go to Qivra Form Builder
- Click Settings in sidebar
- Go to Third party integration section
Step 2: Add Mailchimp API key and Audience ID to the app settings
Section titled “Step 2: Add Mailchimp API key and Audience ID to the app settings”- Find Mailchimp in the provider list
- Click to select it
- Paste the API key and audience ID you just created.
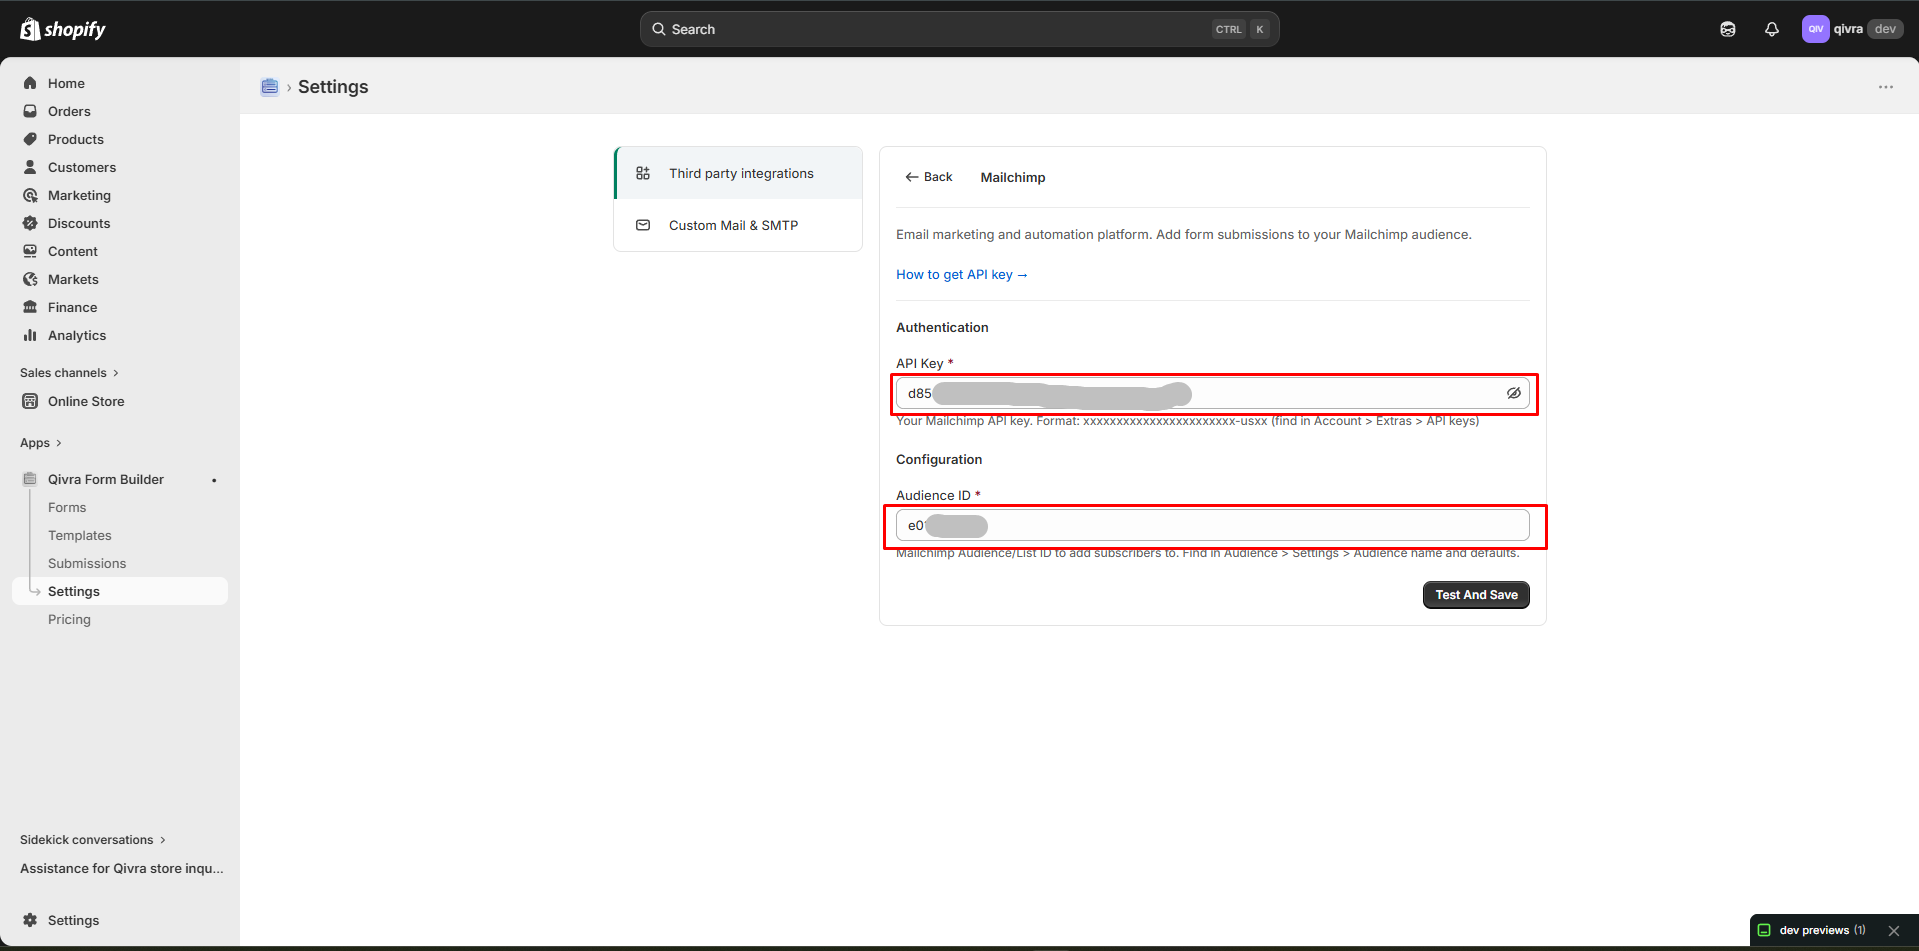
- Click Test and save
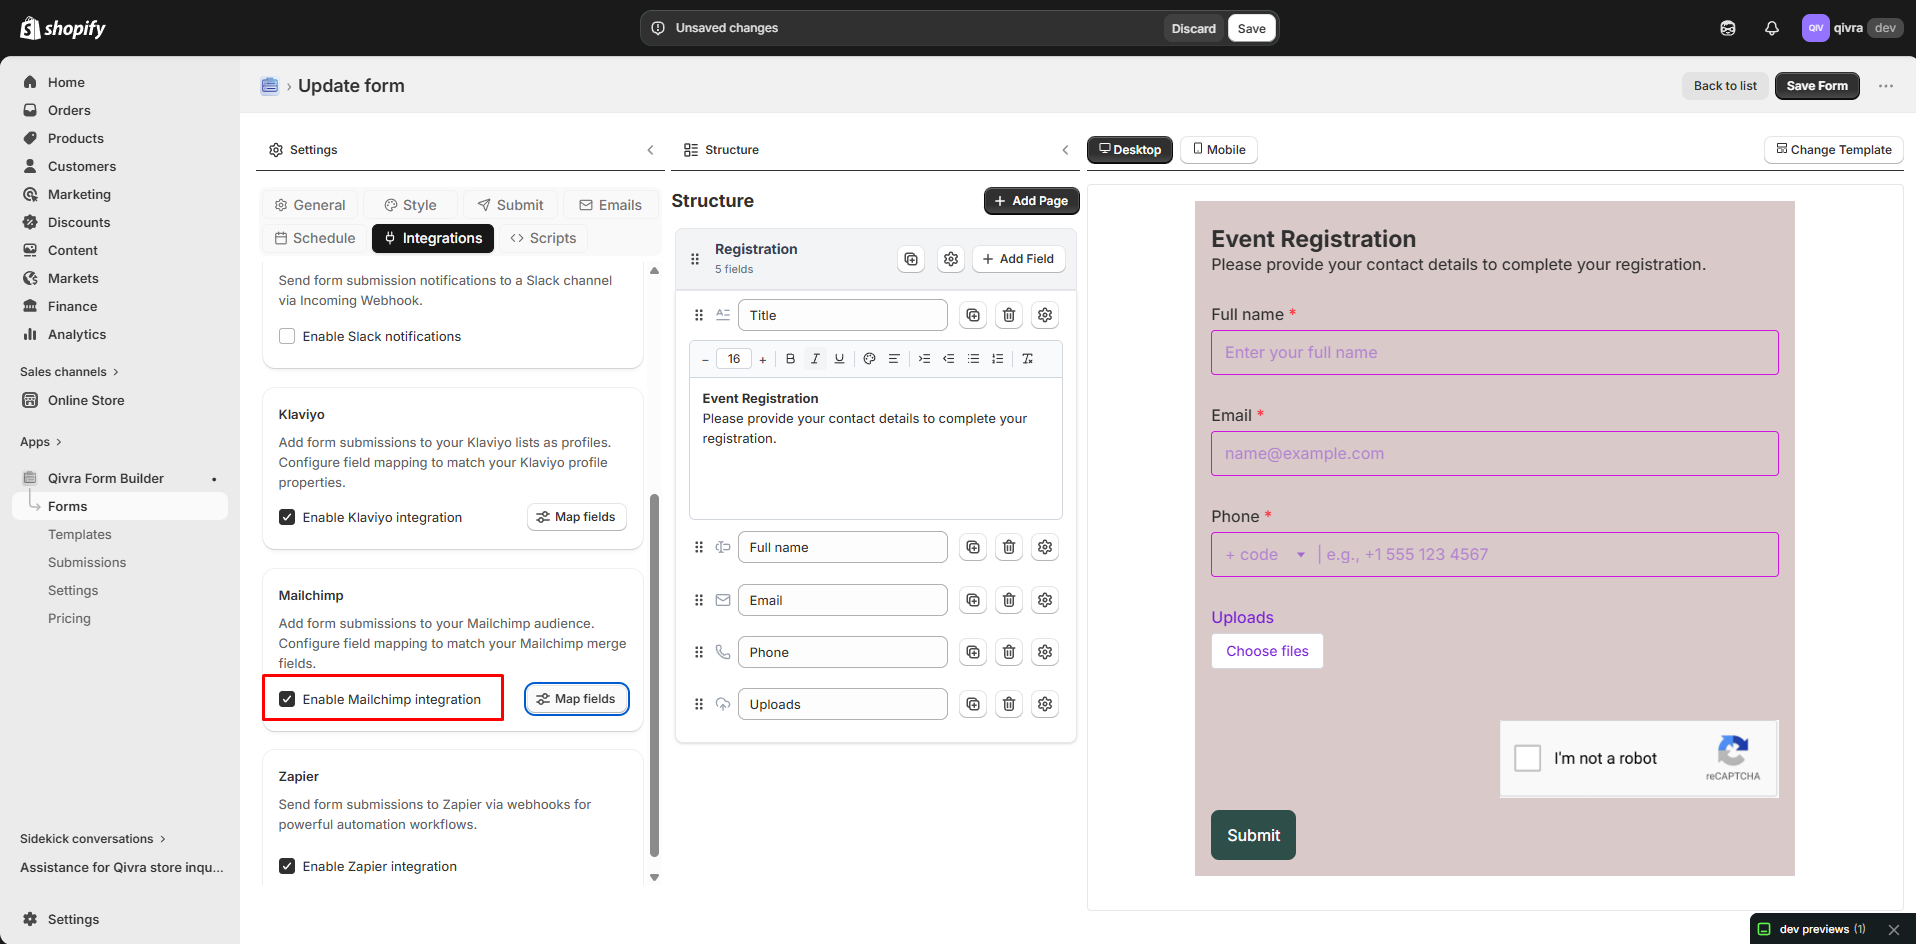
Step 3: Select Mailchimp list
Section titled “Step 3: Select Mailchimp list”- Open the app > click Forms > open the form you want to deal with
- Click Integration on the settings > turn on Mailchimp option
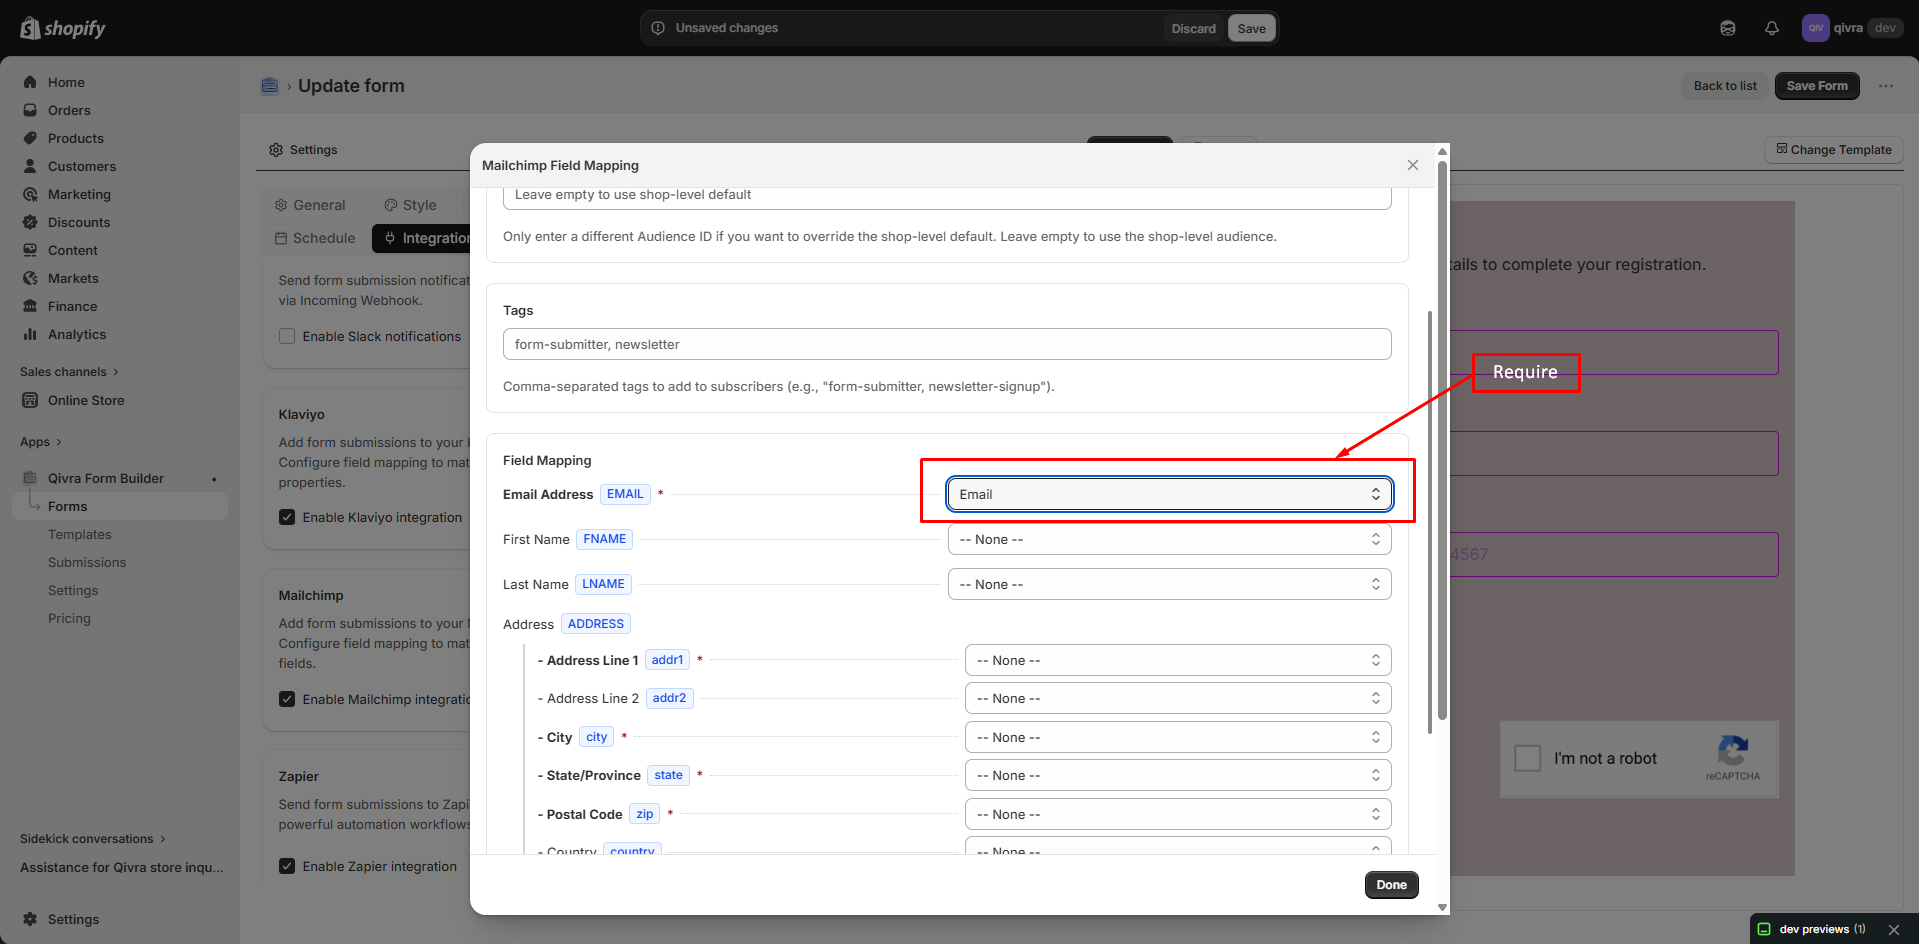
Step 4: Map Form Fields to Mailchimp Fields
Section titled “Step 4: Map Form Fields to Mailchimp Fields”- The Email value is compulsory here to create a new profile in Mailchimp
- The other values are optional. Please map them based on your needs
For example: the First name field of Mailchimp is matched with First name field of the form, the Last name field of Mailchimp is matched with Last name field of the form.
Step 5: Save Settings & Test Your Form
Section titled “Step 5: Save Settings & Test Your Form”- Click Done
- If the form is already published, you just need to save the form after making changes.
How It Works
Section titled “How It Works”After a user submits the form, the form sends data to Mailchimp.
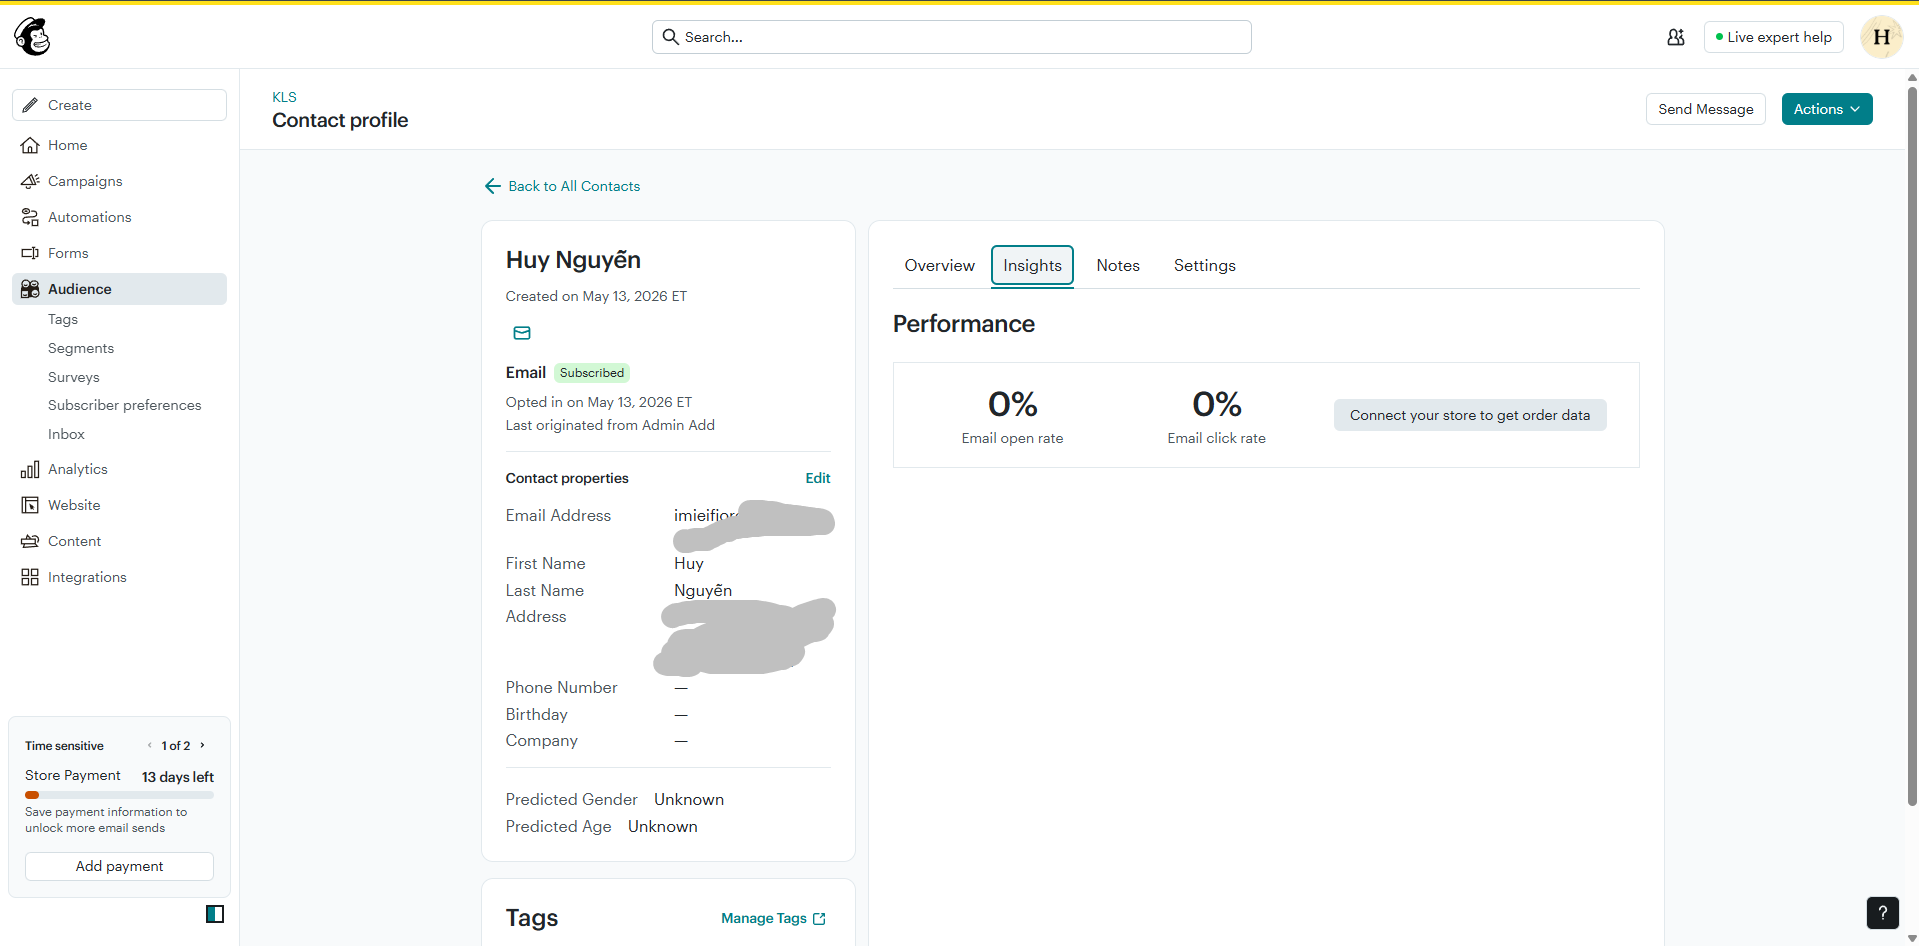
- Mailchimp creates or updates the subscriber profile.
- Log in to your Mailchimp account > go to Audience > All contacts.
- Open the list you integrated with your form > check for the new subscriber profile to confirm data has been added successfully.
Submission detail in the form app:
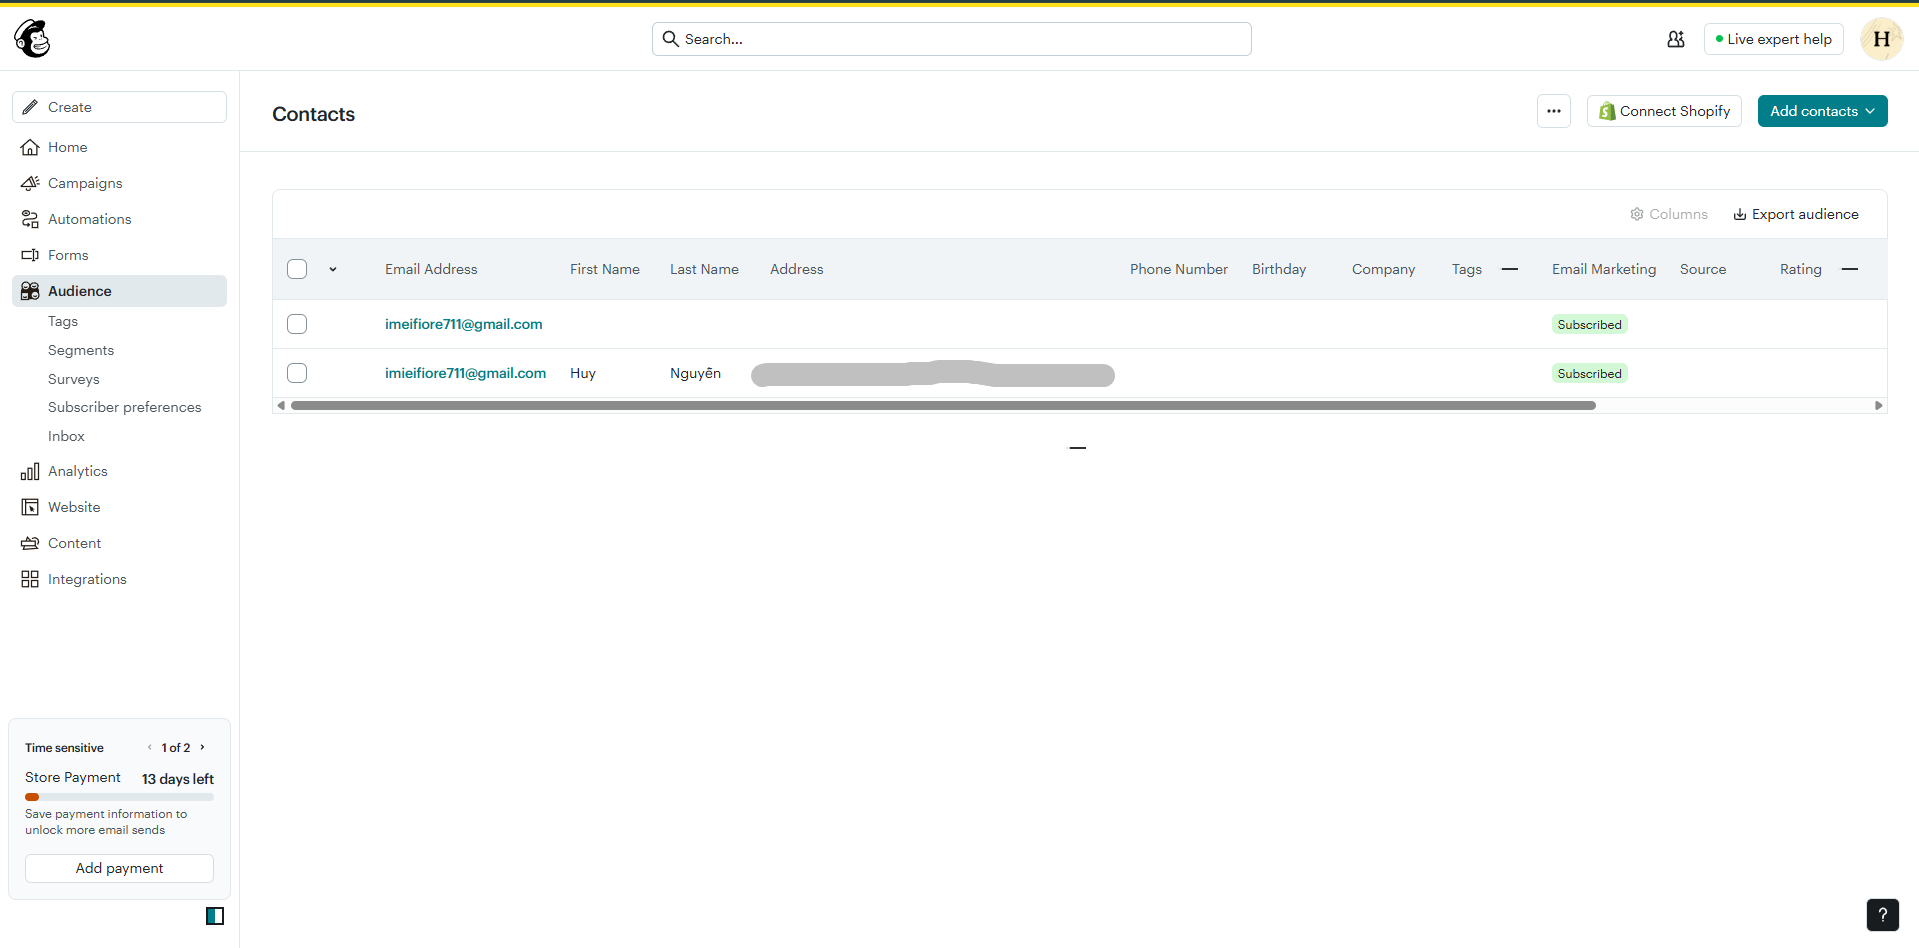
New contact is added to Mailchimp audience list:
Using Mailchimp for Notifications
Section titled “Using Mailchimp for Notifications”Email Notifications via Mailchimp
Section titled “Email Notifications via Mailchimp”To send notification emails through Mailchimp:
- In Settings > Providers
- Select Mailchimp as email provider
- Configure notification settings
Transactional Email Setup
Section titled “Transactional Email Setup”Mailchimp offers transactional email (formerly Mandrill):
- Set up transactional email in Mailchimp
- Use SMTP settings in Qivra
- Or use Mailchimp API for sending
Form-Level Settings
Section titled “Form-Level Settings”Per-Form Audience
Section titled “Per-Form Audience”Use different audiences for different forms:
- Open form in Form Builder
- Go to Settings > Integrations
- Select Mailchimp audience
Opt-In Settings
Section titled “Opt-In Settings”Control how contacts are added:
| Setting | Description |
|---|---|
| Single Opt-In | Added immediately |
| Double Opt-In | Confirmation email sent |
| Update Existing | Update if contact exists |
Tagging Contacts
Section titled “Tagging Contacts”Add tags to organize contacts:
- In form integration settings
- Add tags to apply to contacts
- Tags help segment your audience
Example Tags:
- “Contact Form”
- “Newsletter Signup”
- “Product Inquiry”
Sync Behavior
Section titled “Sync Behavior”When Contacts Sync
Section titled “When Contacts Sync”Contacts are added to Mailchimp when:
- Form is submitted successfully
- Email field is present
- Integration is enabled
Field Updates
Section titled “Field Updates”If contact already exists:
| Setting | Behavior |
|---|---|
| Update existing | Updates fields with new data |
| Skip existing | Keeps original data |
| Error | Fails if duplicate |
Testing the Integration
Section titled “Testing the Integration”Test Submission
Section titled “Test Submission”- Submit a test form
- Check Mailchimp audience
- Verify contact appears
Check Field Mapping
Section titled “Check Field Mapping”- Review contact details in Mailchimp
- Ensure all fields mapped correctly
- Check tags are applied
Mailchimp Features You Can Use
Section titled “Mailchimp Features You Can Use”Groups
Section titled “Groups”Organize contacts into groups:
- Create groups in Mailchimp
- Map form fields to groups
- Contacts are grouped automatically
Segments
Section titled “Segments”Create segments based on form data:
- Use tags from forms
- Create segments in Mailchimp
- Target specific audiences
Automation Triggers
Section titled “Automation Triggers”Trigger email sequences:
- Set up automation in Mailchimp
- Trigger on tag or group
- Form submissions start sequences
Troubleshooting
Section titled “Troubleshooting”Contacts Not Syncing
Section titled “Contacts Not Syncing”| Cause | Solution |
|---|---|
| Invalid API key | Verify and re-enter key |
| Wrong audience | Check audience selection |
| Missing email | Ensure form has email field |
| Rate limits | Check Mailchimp plan limits |
Field Mapping Issues
Section titled “Field Mapping Issues”| Issue | Solution |
|---|---|
| Field not syncing | Check mapping is correct |
| Wrong data | Verify field types match |
| Missing fields | Add merge fields in Mailchimp |
API Errors
Section titled “API Errors”| Error | Meaning |
|---|---|
| 401 Unauthorized | Invalid API key |
| 404 Not Found | Wrong audience ID |
| 429 Rate Limited | Too many requests |
Mailchimp Pricing Considerations
Section titled “Mailchimp Pricing Considerations”Contact Limits
Section titled “Contact Limits”| Plan | Contacts |
|---|---|
| Free | 500 |
| Essentials | 50,000 |
| Standard | 100,000 |
Email Limits
Section titled “Email Limits”Free plan includes 1,000 emails/month. Check your plan for limits.
Best Practices
Section titled “Best Practices”List Management
Section titled “List Management”- Keep audiences organized
- Use tags for segmentation
- Clean inactive contacts regularly
Opt-In Compliance
Section titled “Opt-In Compliance”- Honor unsubscribe requests
- Include required footer info
- Follow email regulations (GDPR, CAN-SPAM)
Data Quality
Section titled “Data Quality”- Validate email addresses
- Collect necessary info only
- Keep fields up to date